Make your mark & own it!
The EasyScriber is a torch add-on that converts your Hypertherm® Plasma Torch into a surface-etching scriber tool, allowing you to provide an additional service direct from your STVCNC® plasma table.

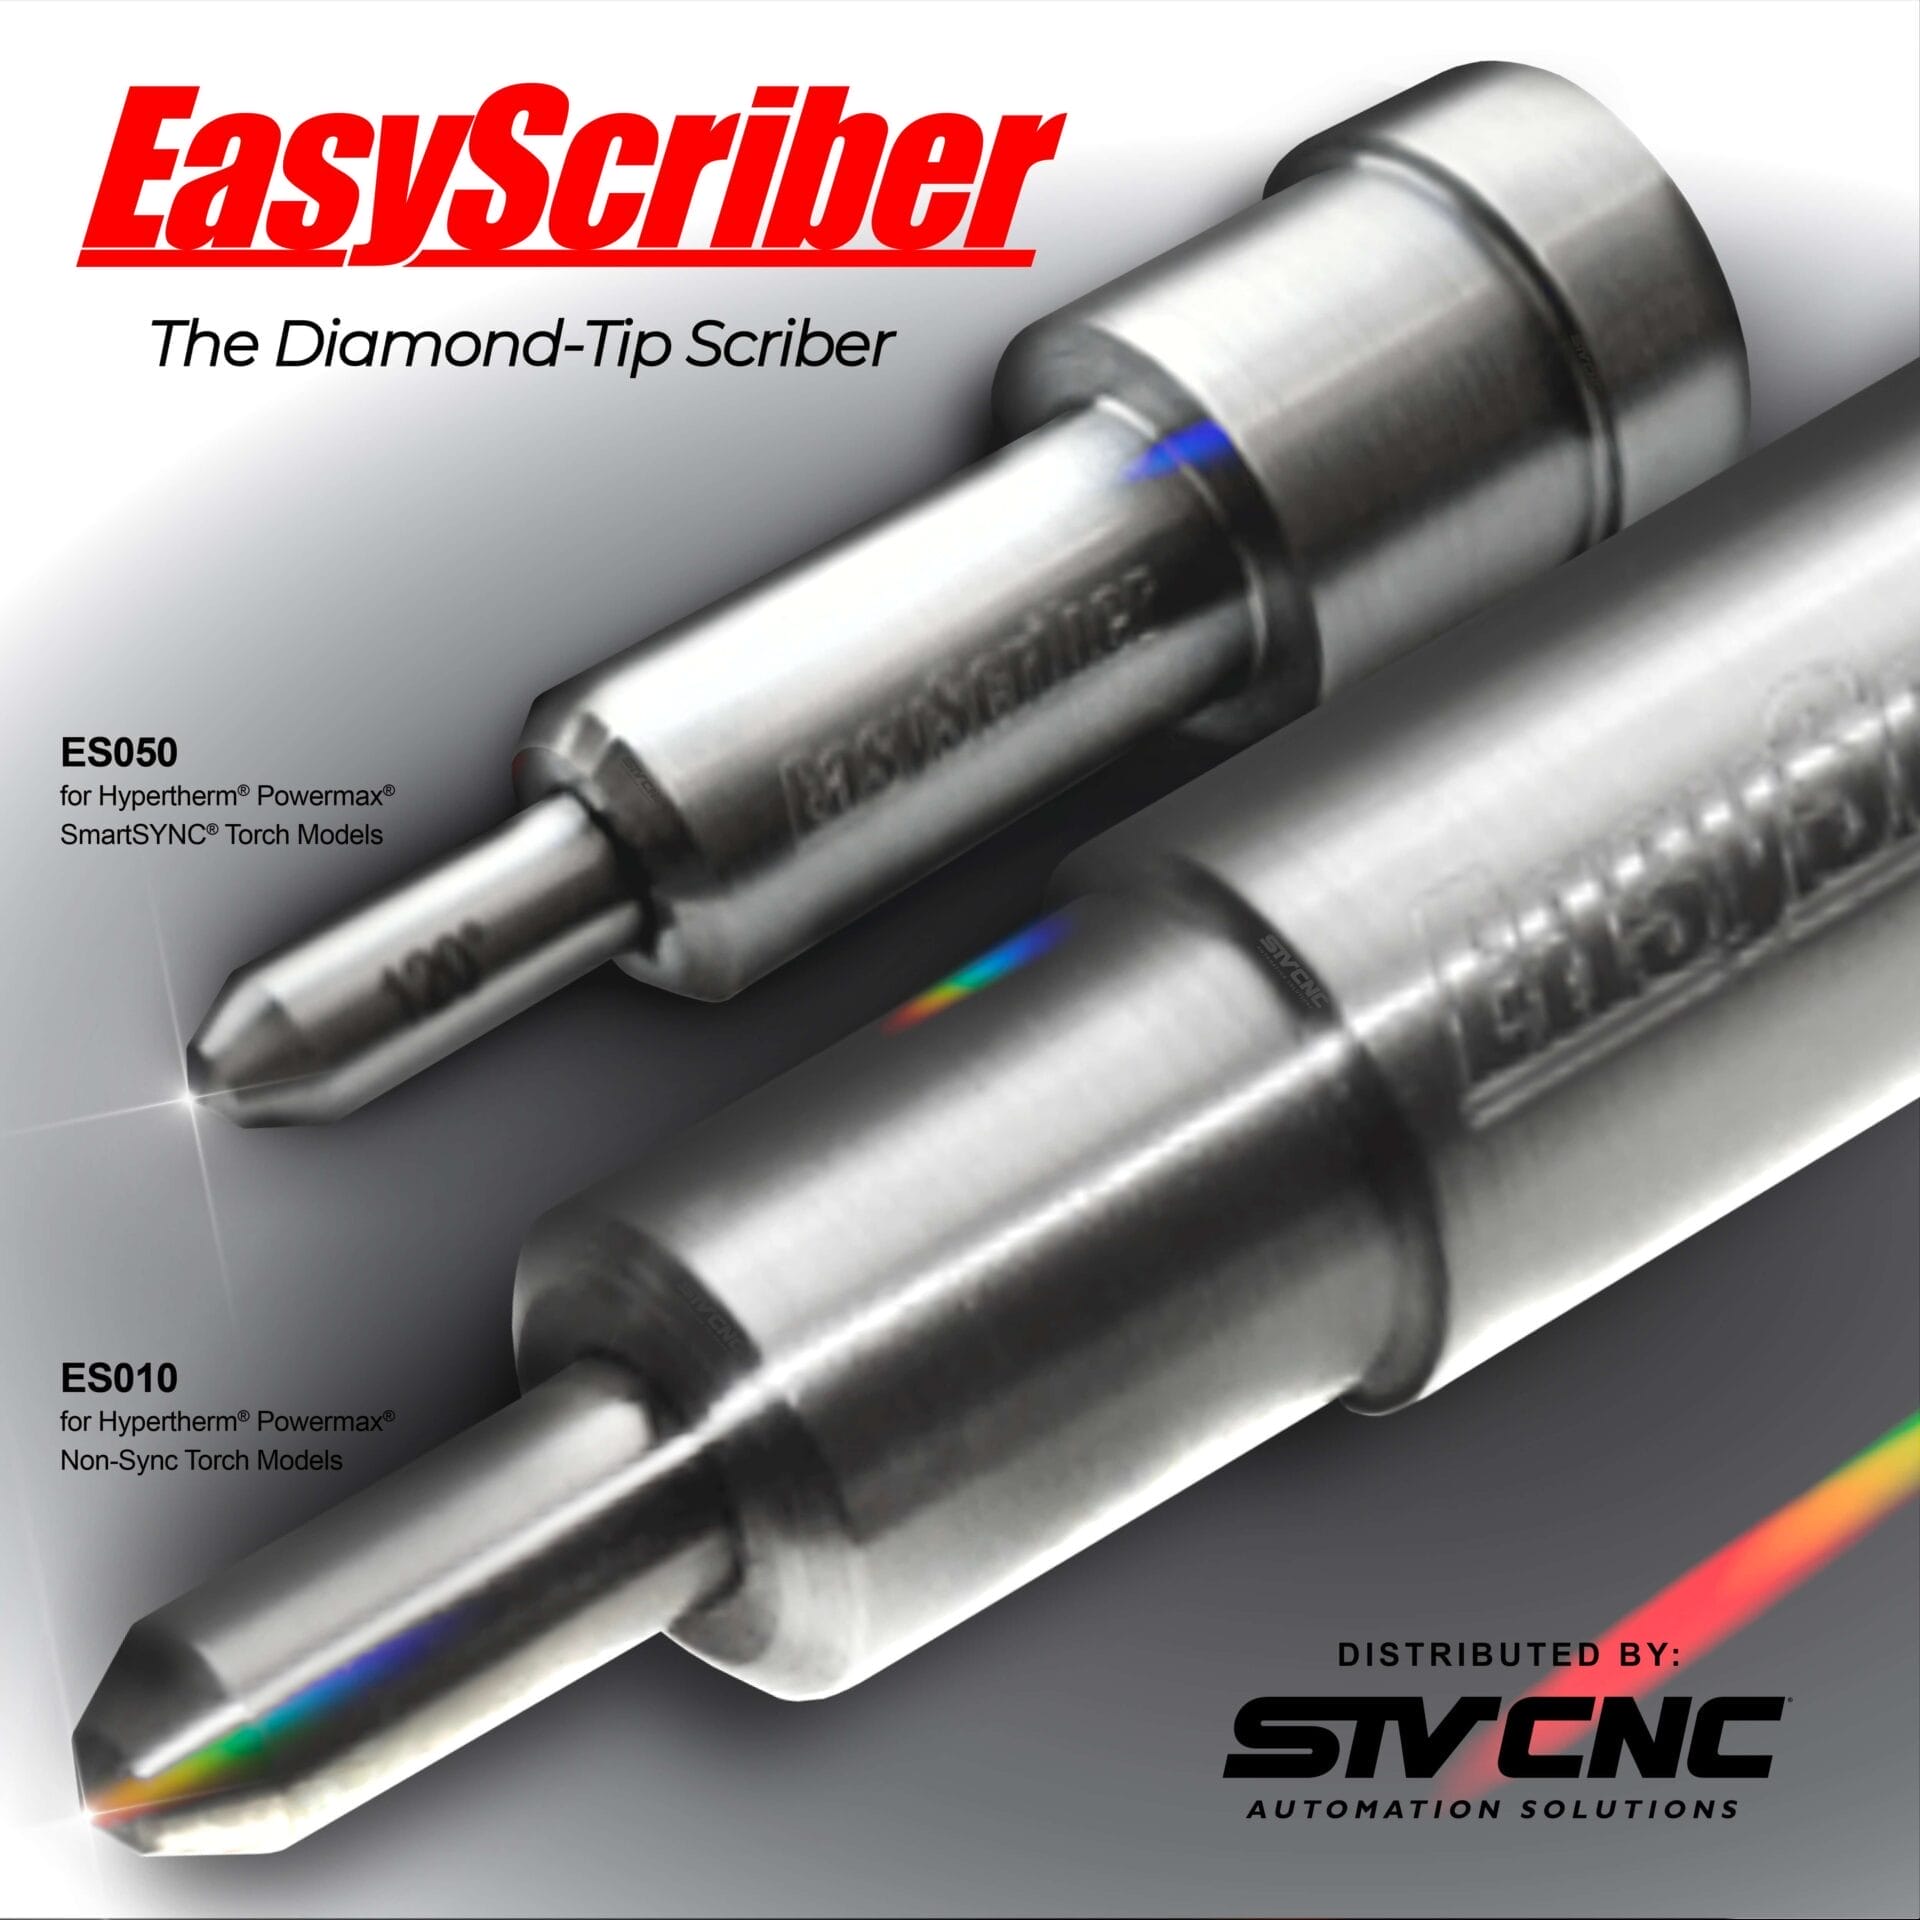
EasyScriber ES050
Have your production house provide an additional service with the EasyScriber ES050. Scribe, etch and mark your custom work with decorative surface engravings that will beautify your metalworks.
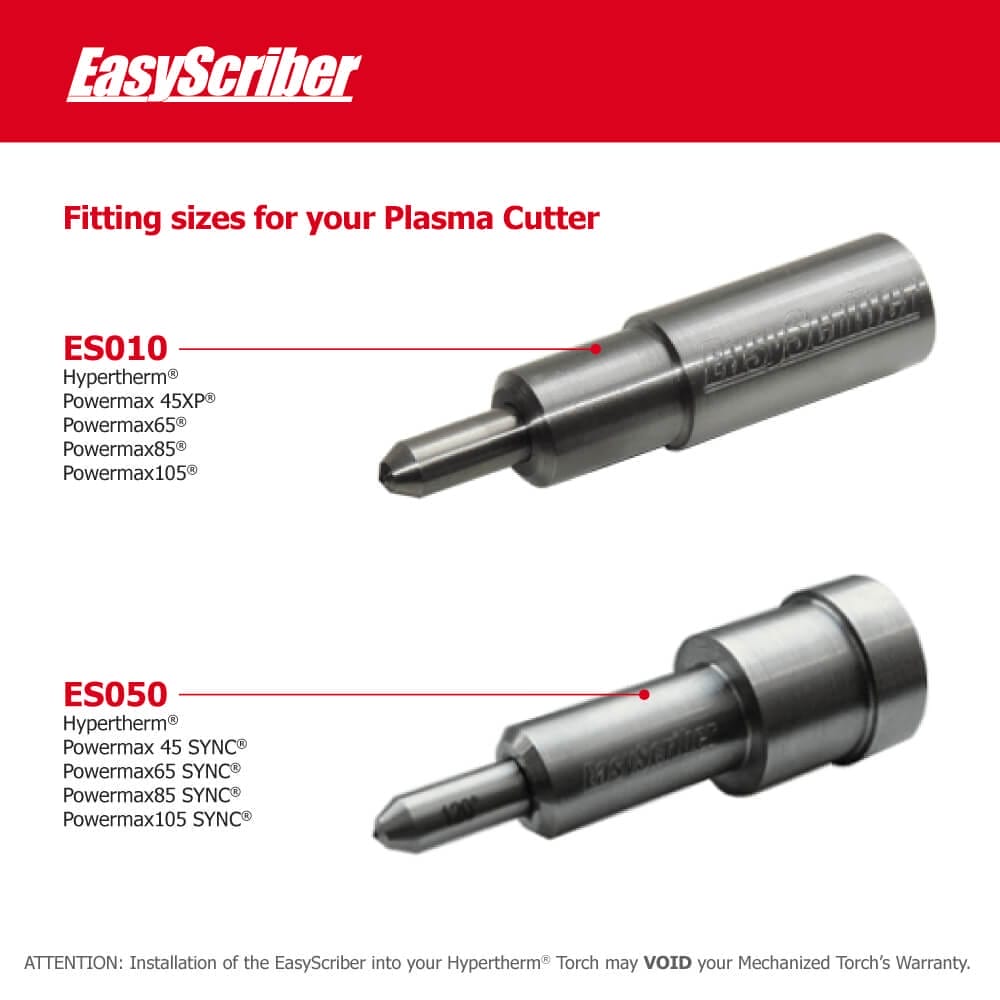
Compatibility: Hypertherm® Powermax45 SYNC®, 65, 85, & 105 SmartSYNC® Torch Models by simply modifying one of your used Powermax SYNC® Cartridges. Switch from cutting operations to scribing operations quick and easy.
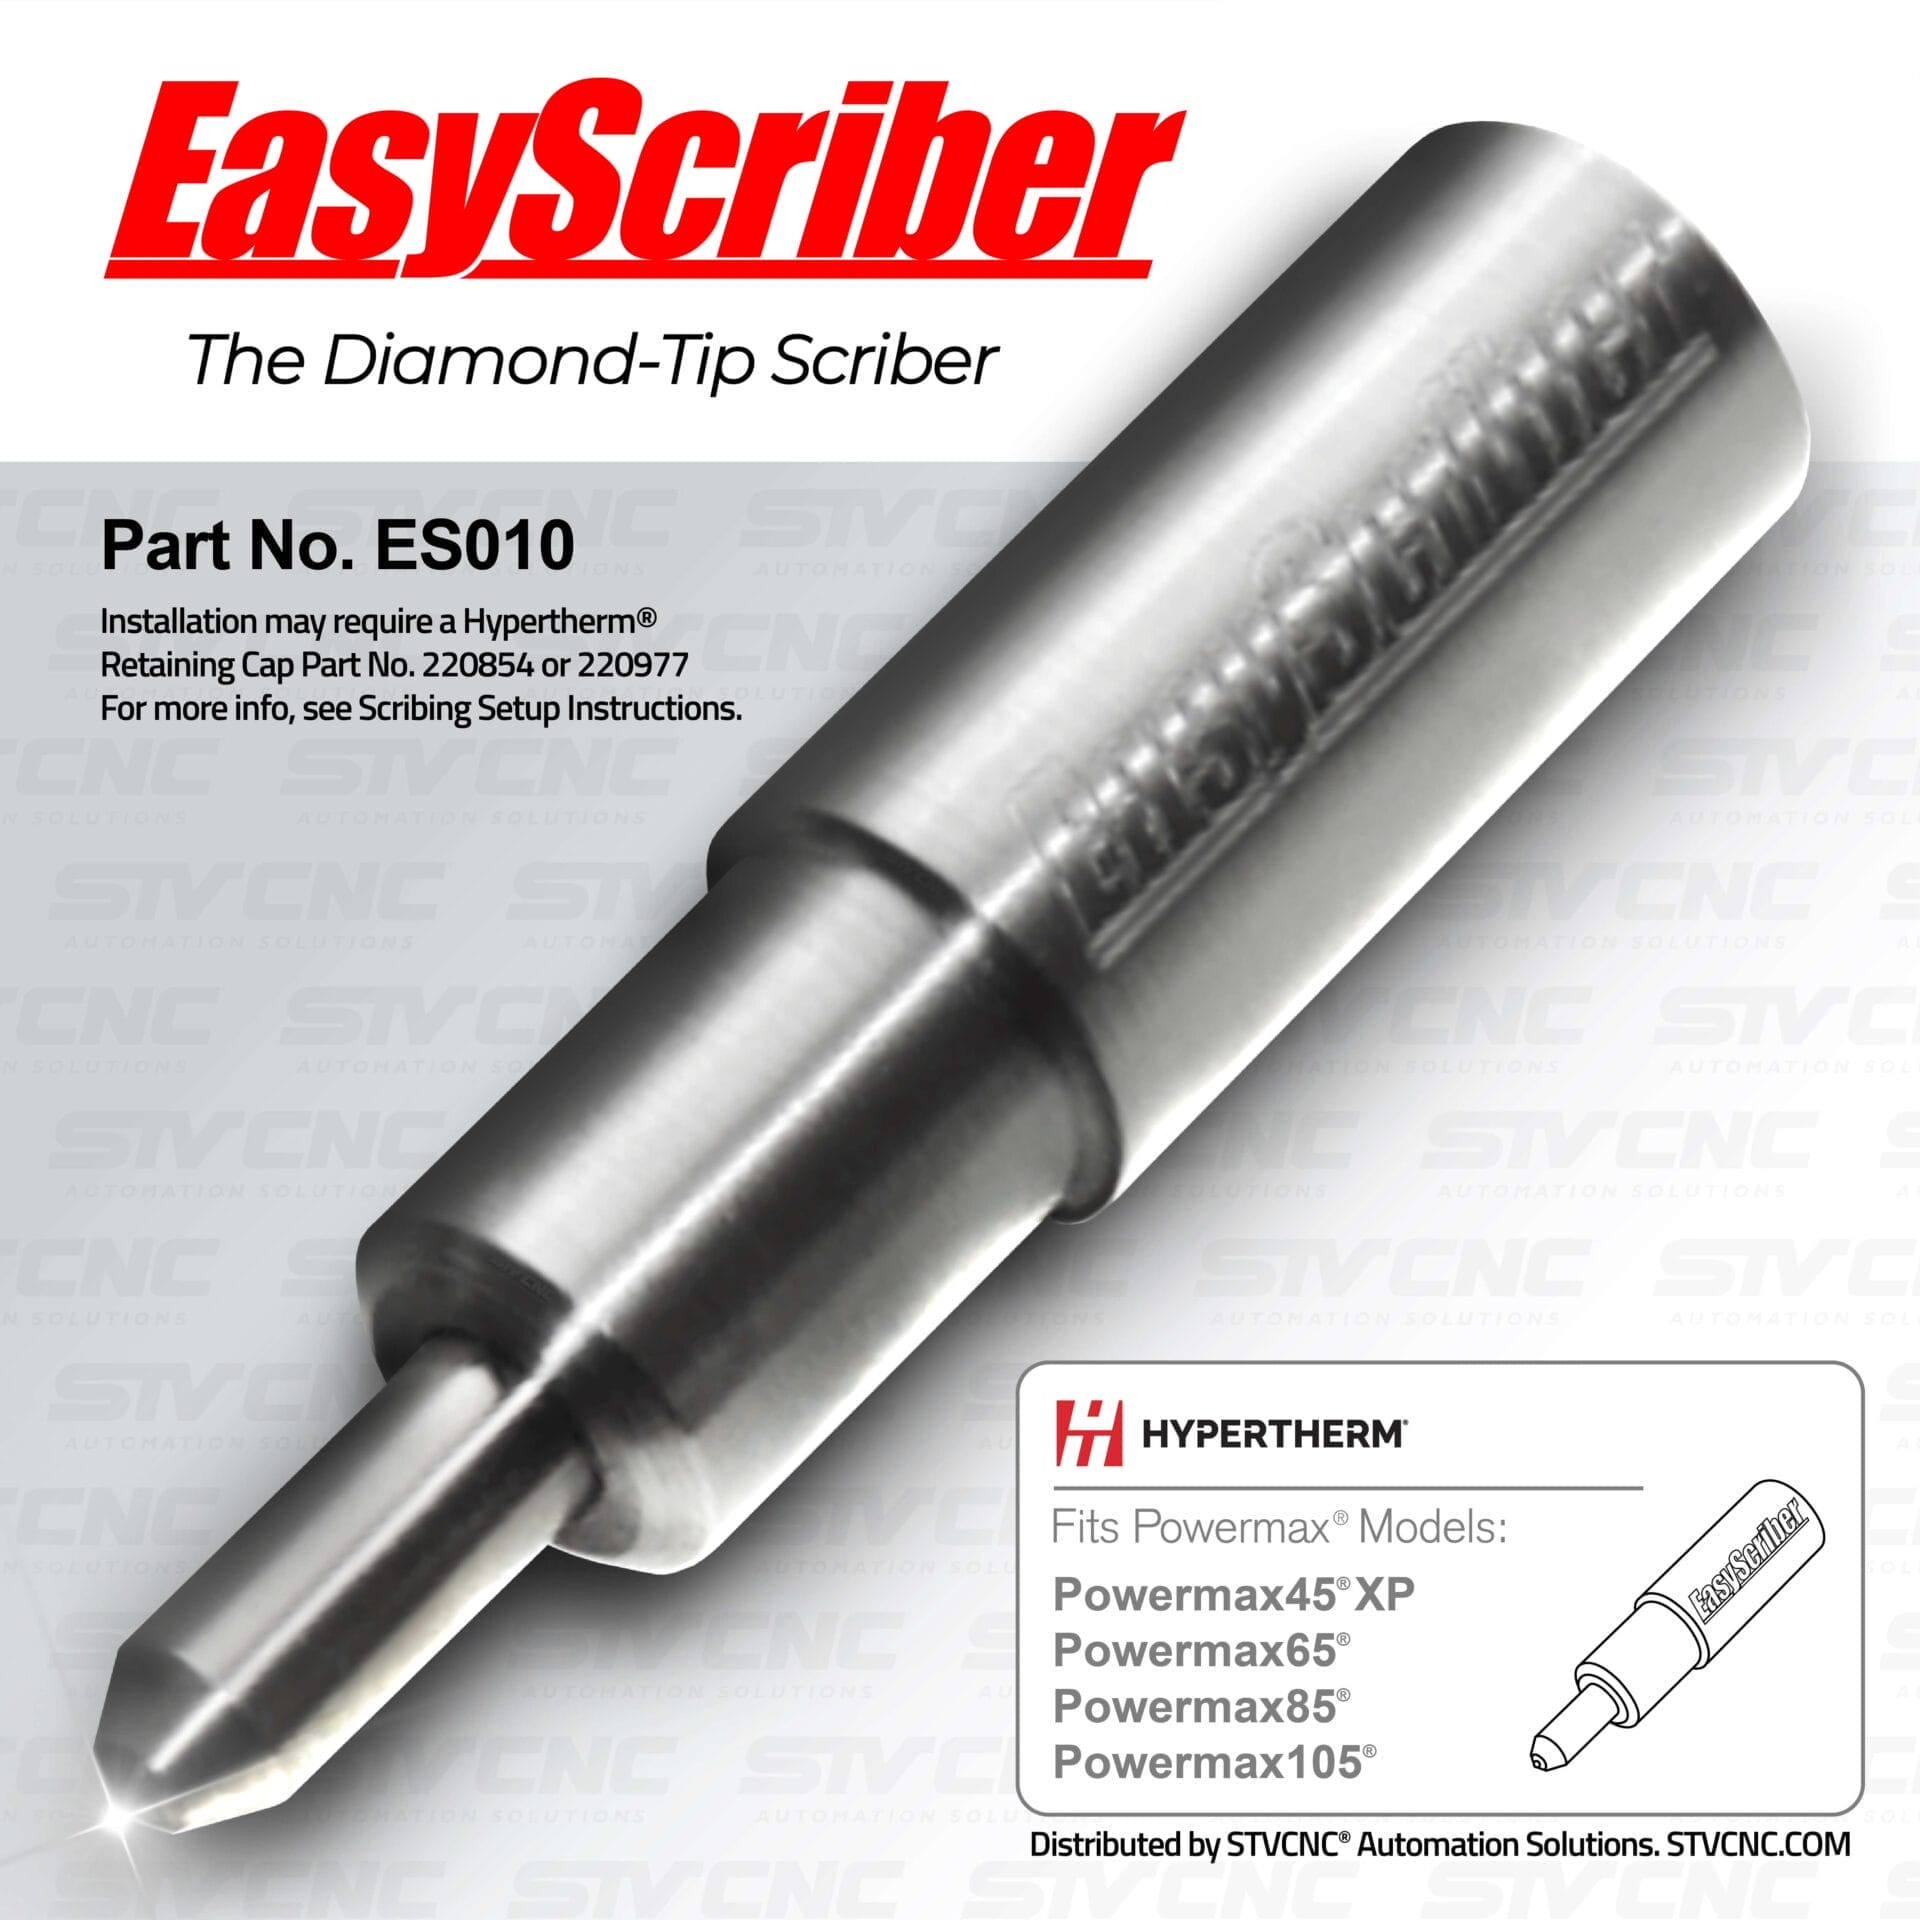
EasyScriber ES010
Even with an older Hypertherm® model, one can make trophy etchings and signage markings a breeze. Increase your profit margins by offering custom surface engravings along with your craft and fabrication.
Compatibility: Hypertherm® Powermax45® XP, 65, 85, and 105 Non-Sync Torch Models. The EasyScriber can be installed and un-installed from your plasma torch in 30 seconds giving you the ability to switch from cut operation to scribe operation quickly and easily.
Best Result Tips
Installation of the EasyScriber is no more difficult than changing your plasma cutting consumables. Simply unscrew the retaining cap, remove the shield from the retaining cap, remove the torches consumable components, insert the EasyScriber into your retaining cap, and re-install the retaining cap back onto the torch.
This exploded view of a Hypertherm® Duramax® Torch head illustrates the setups for both plasma cutting and EasyScribing, clearly showing the ease and simplicity of the installation. No matter what plasma cutter and torch you are using the installation remains just as fast and easy.
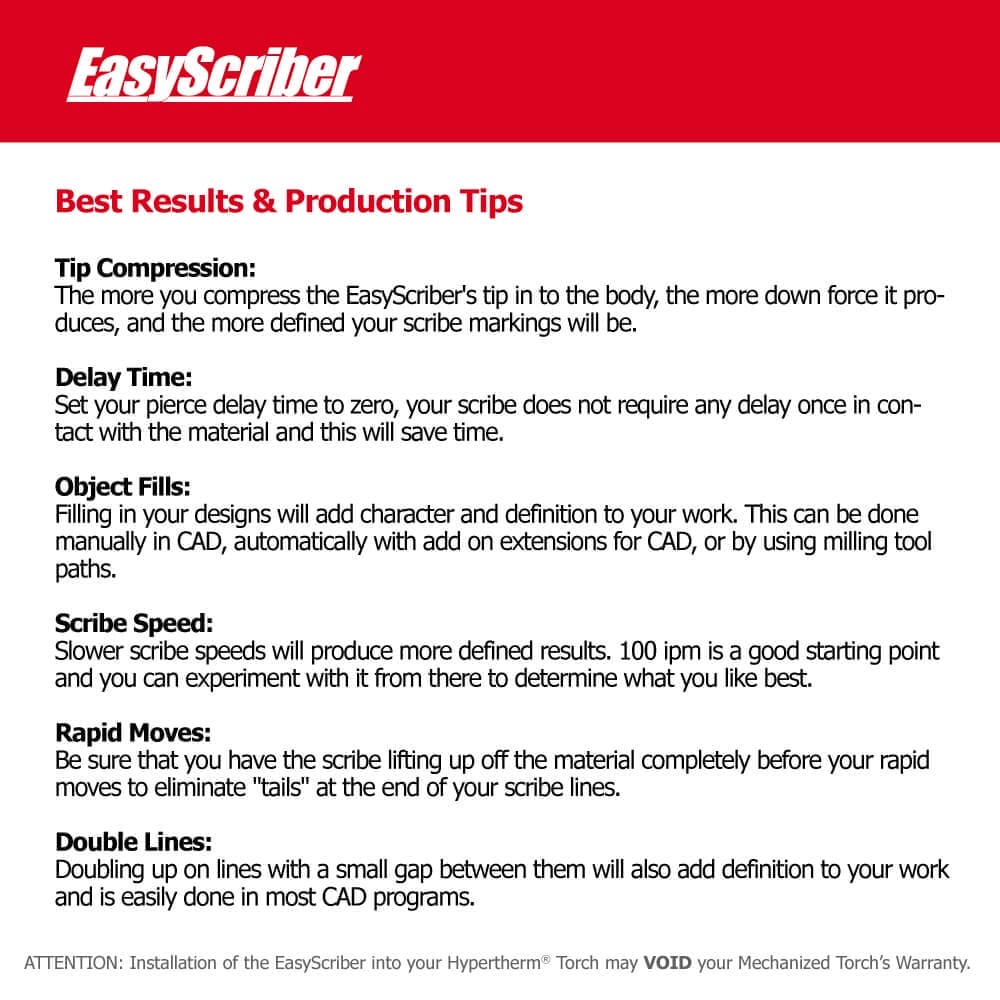
Tip Compression:
The more you compress the EasyScriber’s tip in to the body, the more down force it produces, and the more defined your scribe markings will be.
Delay Time:
Set your pierce delay time to zero, your scribe does not require any delay once in contact with the material and this will save time.
Object Fills ( Hatching ):
Filling in your designs will add character and definition to your work. This can be done manually in CAD, automatically with add on extensions for CAD, or by using milling tool paths.
Scribe Speed:
Slower scribe speeds will produce more defined results. 100 ipm is a good starting point and you can experiment with it from there to determine what you like best.
Rapid Moves:
Be sure that you have the scribe lifting up off the material completely before your rapid moves to eliminate “tails” at the end of your scribe lines.
Double Lines:
Doubling up on lines with a small gap between them will also add definition to your work and is easily done in most CAD programs.
Videos
Install ES010 EasyScriber for Non-Sync Hypertherm®
Install ES050 EasyScriber for Hypertherm® SYNC®
Add "HATCHING" to your etched designs
Installation
EasyScriber Installation for Optimum CNC
Before You Begin
– Disconnect or disable plasma power; wear safety gear.
– Ensure torch is cool and safe to handle.
Step-by-Step
1. Remove the retaining cap from the torch head.
2. Take out the shield and consumable components (electrode, nozzle, swirl ring, etc.).
3. Follow the installation video provided below depending which Hypertherm® Torch Model you have.
4. Confirm the scriber tip is straight and centered.
5. Start OptimumCNC
6. Home the Machine
7. Wait for X, Y, and Z to finish homing completely.
8. Disable All Plasma-Related Systems. On the left side of the Optimum CNC Interface, tap Advanced. Tap User Settings. Turn IHC / IHS OFF. Turn THC OFF (This prevents torch height control from slamming the scribe into the plate.)
9. Select the “EasyScriber” Cut Chart / Tool. Tap on the Plasma tab. Tap Charts. Scroll and select the chart/tool named:
EasyScriber. Tap Apply Chart or Load Mode. (This loads the safe parameters for marking.)
10. Verify Torch Fire is Disabled. On the main screen bottom controls: Make sure the Torch Fire toggle is OFF.
(It should be greyed out or unlit. This guarantees no plasma firing while engraving.)
11. Load Your Engraving G-Code File. On the left side, tap G-Code. Tap Load File. Select your engraving file (created with the EasyScriber tool in CAM). You should see the preview path appear on screen.
12. Move Above Your Starting Point. Tap Move To at the top or bottom bar. Choose: Work X0 Y0 or use Jog to move manually. Raise Z slightly above the material (Z = 0.100″ is safe).
13. Start Engraving. Double-check: EasyScriber is installed on the torch. THC = OFF, IHC = OFF, Torch Fire = OFF. EasyScriber chart is selected. Tap Play (Start Program). The torch will: Lower to the scribe height (using your Z offset). Begin the engraving toolpaths. Move smoothly without firing plasma.
14. After Engraving – Switch Back to Plasma Cutting. When done engraving: Remove the EasyScriber from the torch. Reinstall your normal Hypertherm consumables or Sync cartridge. On OptimumCNC: Go to Advanced → User Settings. Turn IHC/IHS ON. Turn THC ON. Go to Plasma → Charts and select your normal cutting chart. Verify Torch Fire is allowed again.
Tips
– Compressing the tip slightly increases scribe pressure.
– Slower movement speeds usually produce deeper, cleaner marks.
EasyScriber Installation for MyPlasm CNC
Before You Begin
– Disconnect or disable plasma power; wear safety gear.
– Ensure torch is cool and safe to handle.
Step-by-Step
1. Turn on CNC + Start MyPlasm. Power on your CNC electronics. Open the MyPlasm CNC software. Wait until the software fully loads and connects to the controller.
2. Home the Machine. On the main screen, tap HOMING (or “HOME ALL”). Wait for X, Y, and Z to finish homing. This must be done before height settings or engraving.
3. Disable ALL Plasma & Height Control Functions (Critical). Proma MyPlasm always tries to fire the torch unless you disable it. You MUST turn OFF: Plasma Fire, Pierce Height, Cutting Height, Arc OK / Arc Transfer, Proma THC, Automatic Z control, IHS (Initial Height Sense) Do it step-by-step:
(A) Disable Torch Fire. On the main screen, locate the Torch icon/button. Make sure it is OFF (not highlighted).
(B) Disable Height Control. Tap Settings or Technology tab (depends on MyPlasm version). Turn OFF: ARC OK, THC ACTIVE (Proma Height Control), IHS (initial probe), Auto Z.
(C) Disable Plasma Parameters in Your Tool Profile. Go to: Tools / Parameters / Technology. Select the tool you will use for engraving or create one called EasyScriber. Set: Pierce Height = 0. Pierce Delay = 0. Cutting Height = 0. Gas / Air = OFF. Arc OK = OFF. THC = OFF. IHS = OFF. This makes sure no plasma-related action occurs.
4. Create or Select the “EasyScriber” Tool Profile. In Tools / Parameters, make a new tool: Name: EasyScriber. Set these values: Pierce Height: 0.00. Cutting Height: 0.00. Pierce Delay: 0.00. Feedrate: 40–120 in/min (engraving speed). Plunge Rate: 5–15 in/min. Kerf: 0.0. THC: Disabled. IHS / Probe: Disabled. Arc On Code (M-code): Disabled (or manually remove M03/M62 in G-code). Save the tool.
5. Set the Z-Height Manually for Engraving. MyPlasm allows manual Z control, which is exactly what we want. Move to your starting XY location. Jog Z down slowly until the scriber just touches the metal plate. Press Set Z = 0 (button near coordinates readout). Jog Z up to a safe height, around Z = +0.100″. This becomes your engraving reference point.
6. Load the Engraving G-Code File. Tap Load File on the main screen. Select your .nc/.tap engraving file. Preview will appear on screen. Make sure your CAM was set to use the EasyScriber tool you created.
7. Confirm Safety Before Starting. Check these items: Torch Off. THC Off. IHS / Probe Off. Arc OK Disabled. EasyScriber Tool Selected. Z zeroed correctly. Scriber installed in torch. If everything is correct.
8. Start Engraving. Tap: START / RUN. The torch will: Move down to your set Z engrave depth. Follow the toolpath. NOT attempt to probe. NOT fire plasma. NOT lift using THC. Smooth, clean mechanical scribing only.
9. When Finished – Switch Back to Plasma Cutting. Immediately: Remove EasyScriber from torch. Reinstall normal consumables or Sync cartridge. In software: Go to Tools / Technology. Turn ON: IHS / Probe, THC (Proma), Arc OK, Cutting Height, Pierce Height. Select your standard Cutting Tool profile. Enable Torch Fire. Your table is now fully back to normal cutting mode.
Setting up Easyscriber on MyPlasm CNC
FAQ
Do I need additional software or hardware?
No additional software or hardware is required. If you can draw a design and cut it, you can draw a design and scribe it with nothing more than an EasyScriber.
Is the EasyScriber designed for Deep Engraving?
No, the EasyScriber is a surface etching tool where you’ll be able to draw and scribe out your designs marking the material for part numbering, plaque signage or other decorative purposes. You can alter the intensity of the marking by selecting what materials or product color or finishings you choose to etch on.
Will it work with a magnetic breakaway?
Yes, will work with magnetic breakaways unless the magnets are weak. The side loading of the torch during scribing operations is very minimal and very similar to lightly dragging your plasma nozzle across the material.
Will this work with a Powermax 45?
Yes, EasyScriber does make a model specifically for the original Powermax 45 which can be found here Powermax 45 The newer Powermax 45XP scribe is different and will not work on the original 45. Please speak with your STVCNC® team member to get this ordered if needed.
What if I had a Standard Torch Type prior and have upgraded my Cutting System to a 125 Torch Type?
If you have upgraded from a 45/65/85/105 Standard or SYNC® Mechanized Torch to a 125 Mechanized Torch Type, please call us 1-855-974-4413, as you will require the rear side of the torch holster clamp to correctly grip your wider 125 Mechanized Torch.
Will it work on my Hypertherm 600, 1250?
If you are using the Duramax® torch upgrade, yes it will work. If you are unsure what torch you are using, look at the part number on your electrodes. If your electrode part number is 220842 then it will work.
Will it work with auto torch height control?
Automatic digital torch height controls require arc voltage to function. Since there is no arc when scribing THC is not used, you will set a working height in your control software.
What is the best speed for scribing?
100ipm works well on any material but you can go as slow or as fast as you like. Slower speeds will produce more defined results.
How can I make my scribes more defined?
Setting a lower working height and compressing the tip more will produce more defined lines. Techniques like hatch line fills, double lines, and using milling tool paths are other techniques to increase definition.
Do you have a scribe for Everlast plasma?
EasyScriber currently does not offer a scribe for the Everlast plasma cutters. EasyScriber does offer a universal scribe that can be adapted to fit any machine if you fabricate a custom holder for it.
Do you have a scribe for routers or mills?
Yes, EasyScriber offers a universal scribe with a straight .500″ body that can installed on a router or mill in a .500″ collet. This scribe can be found here Universal Scribe. Speak to your STVCNC® Team Member to have this item ordered if needed.
How long do the diamond tips last?
Tip life depends on the materials you are scribing, but in general you can expect approximately 300 hours of service life on each tip. Speak to your STVCNC® Team Member to have “Replacement tips” ordered if needed.


Reviews
There are no reviews yet.