


A Torch Time Saver!
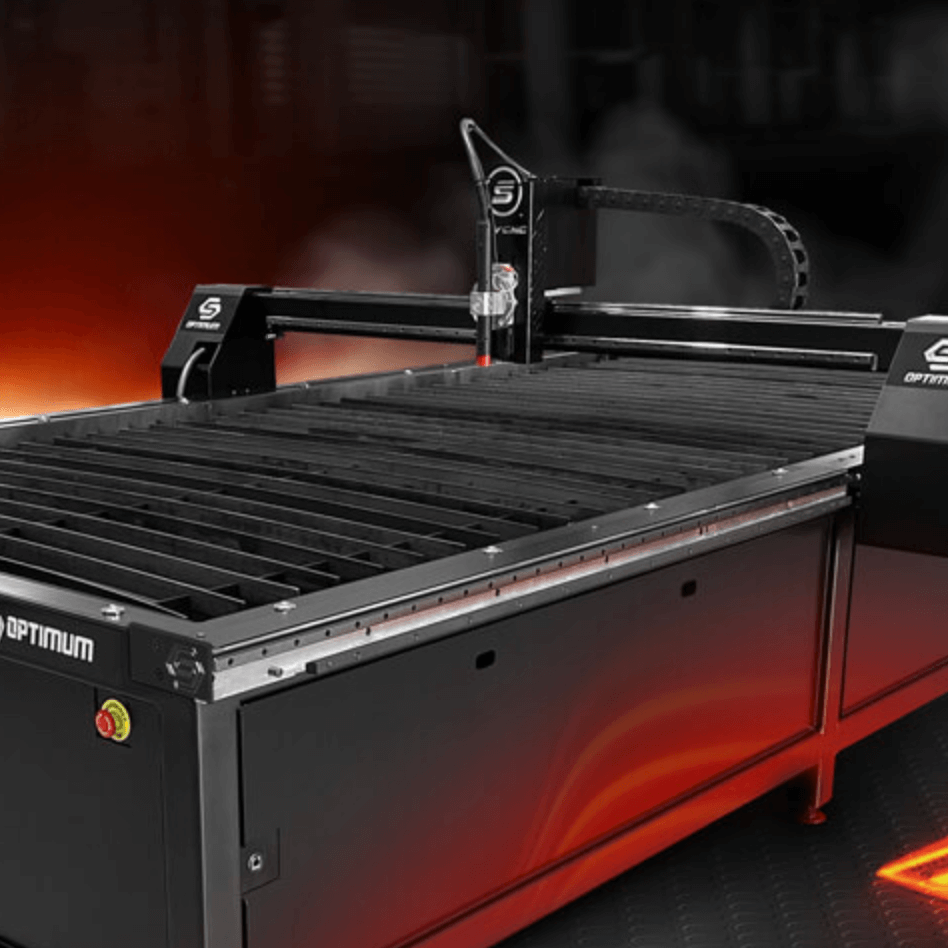
Crafted for Optimum Plasma Tables & Hurricane Pocket Plasma Tables running Optimum CNC Control Systems, the Laser Guide is the perfect visual offset tool to assist in fabrication & steel sheet cut preparations.
Compact & Integratable
Laser Sight quickly works
with multiple CNC controllers.

No Wiring
Easy Install, No Wiring Required,
plus low battery consumption.
Matte Aluminum Finish
We machine and burr in-house,
with a Matte Aluminum finish.
Align & Trace Ready
Laser Guide Assists as a Visual
Aid in Alignment & Position.
➤ Align Torch to desired offset/safe cut location
➤ Accessible ON/OFF button
➤ Battery-powered Laser sight unit
➤ Single red dot sight in black casing
➤ Visual Aid for Jogging, Trace Job & Simulation Mode
➤ Visual Aid for Homing Table
➤ Matte Aluminum Finish
➤ Machined in-house clamp front face
➤ Batteries Included
➤ Fits Optimum Plasma Tables Z-Axis Head
➤ Confirm Torch Parking Locations
➤ Ideal for Alignment & Positioning
NOTICE: *It is stated that your device is not Waterproof. Please inspect your device to confirm you have no manufacturer defects. Keep in mind to safeguard your Laser Guide. We recommend to keep the Laser device switched to OFF and in a dry, clean and safe place near your work area, preferably at room temperature.
How to Instructions
Follow these instructions for the Laser Guide for installation and then watch the video below to continue on-screen for your Optimum CNC Software Offset settings.
1. Loosen the 6 screws from your Optimum Plasma Table's Torch Holster that is clamping your torch. Set your mechanized torch to the side.
2. Remove the Torch Holster Front Face you currently have installed on the Optimum Plasma Table. Set it to the side along with your screws.
3. Unbox your NEW Aluminum Laser Guide Front Face and mount it onto your Z-Axis base plate. Insert your Mechanized Torch into the Torch Clamp & Rack Hole (shown in diagram below). Locate the (6) screws you have and lock them into place, making sure you have 7.5" inches from the bottom of the torch holster down to the tip of the Torch. The longer screws will lock the Torch Holster onto the backplate.
4. Unbox your Laser Sight and unscrew the "button end" cap of the Laser Sight.
5. Install LR41 batteries facing downwards with the (+) Positive end of the battery facing up towards the button end. The Negative face of each battery should face the laser end of the casing. The battery's engraved inscriptions should be facing towards the button end of the laser. Make sure to remove the film plastic holding the batteries together.
6. Place and screw the cap back onto the laser casing.
7. Insert the Laser Sight into the Laser Mount hole (shown in the diagram below).
8. The Laser Guide will not be flush to the aluminum block. This is to allow for laser removal and ON/OFF button access. The ON/OFF button works like a clicking pen. Press the button until it clicks and the Laser will power ON. Press the button again until it clicks, to power OFF.
9. Maintain your Aluminum Laser Guide by inspecting it ever so often keeping the block clean as well as keeping any opening free and clear of debris or gunk that may obstruct the laser's path.
10. Important: Avoid Direct Eye Exposure to the Laser. Turn OFF your Laser when not in use.
Continue Installation with the following video for your Optimum CNC Software
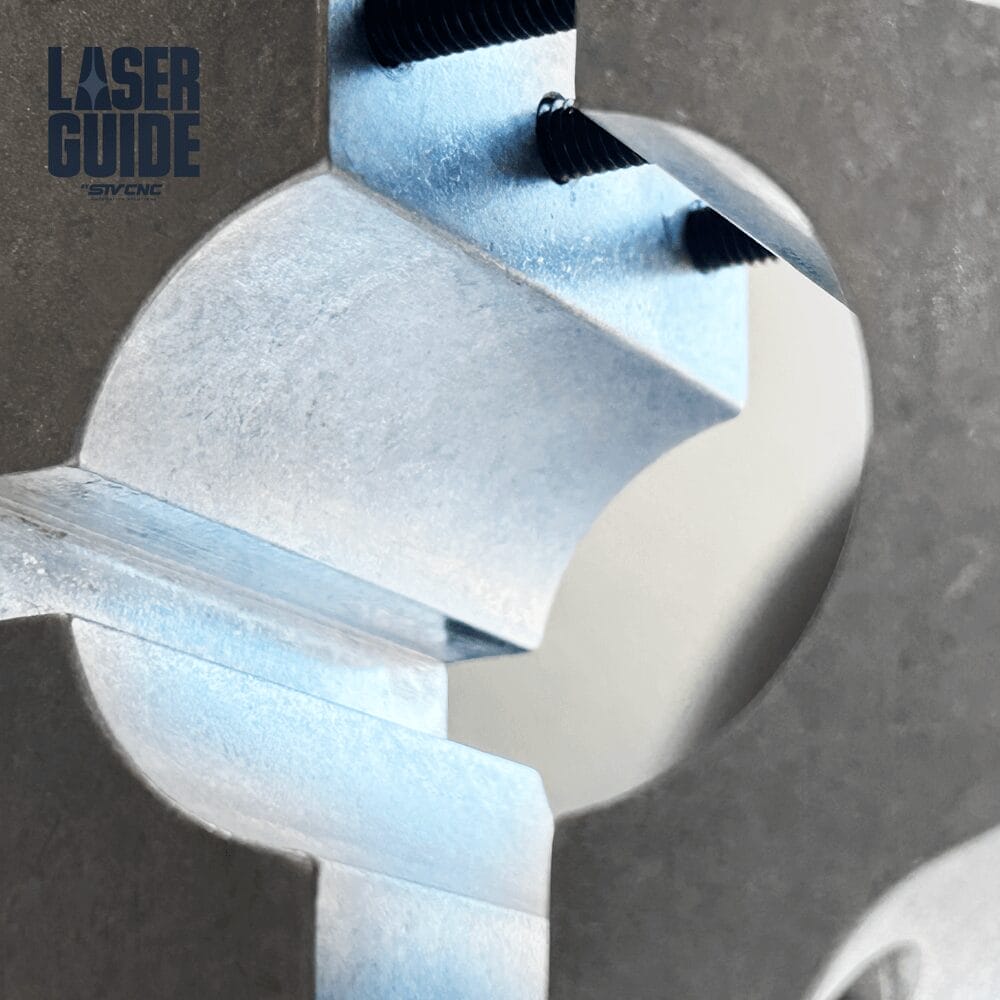
Functions
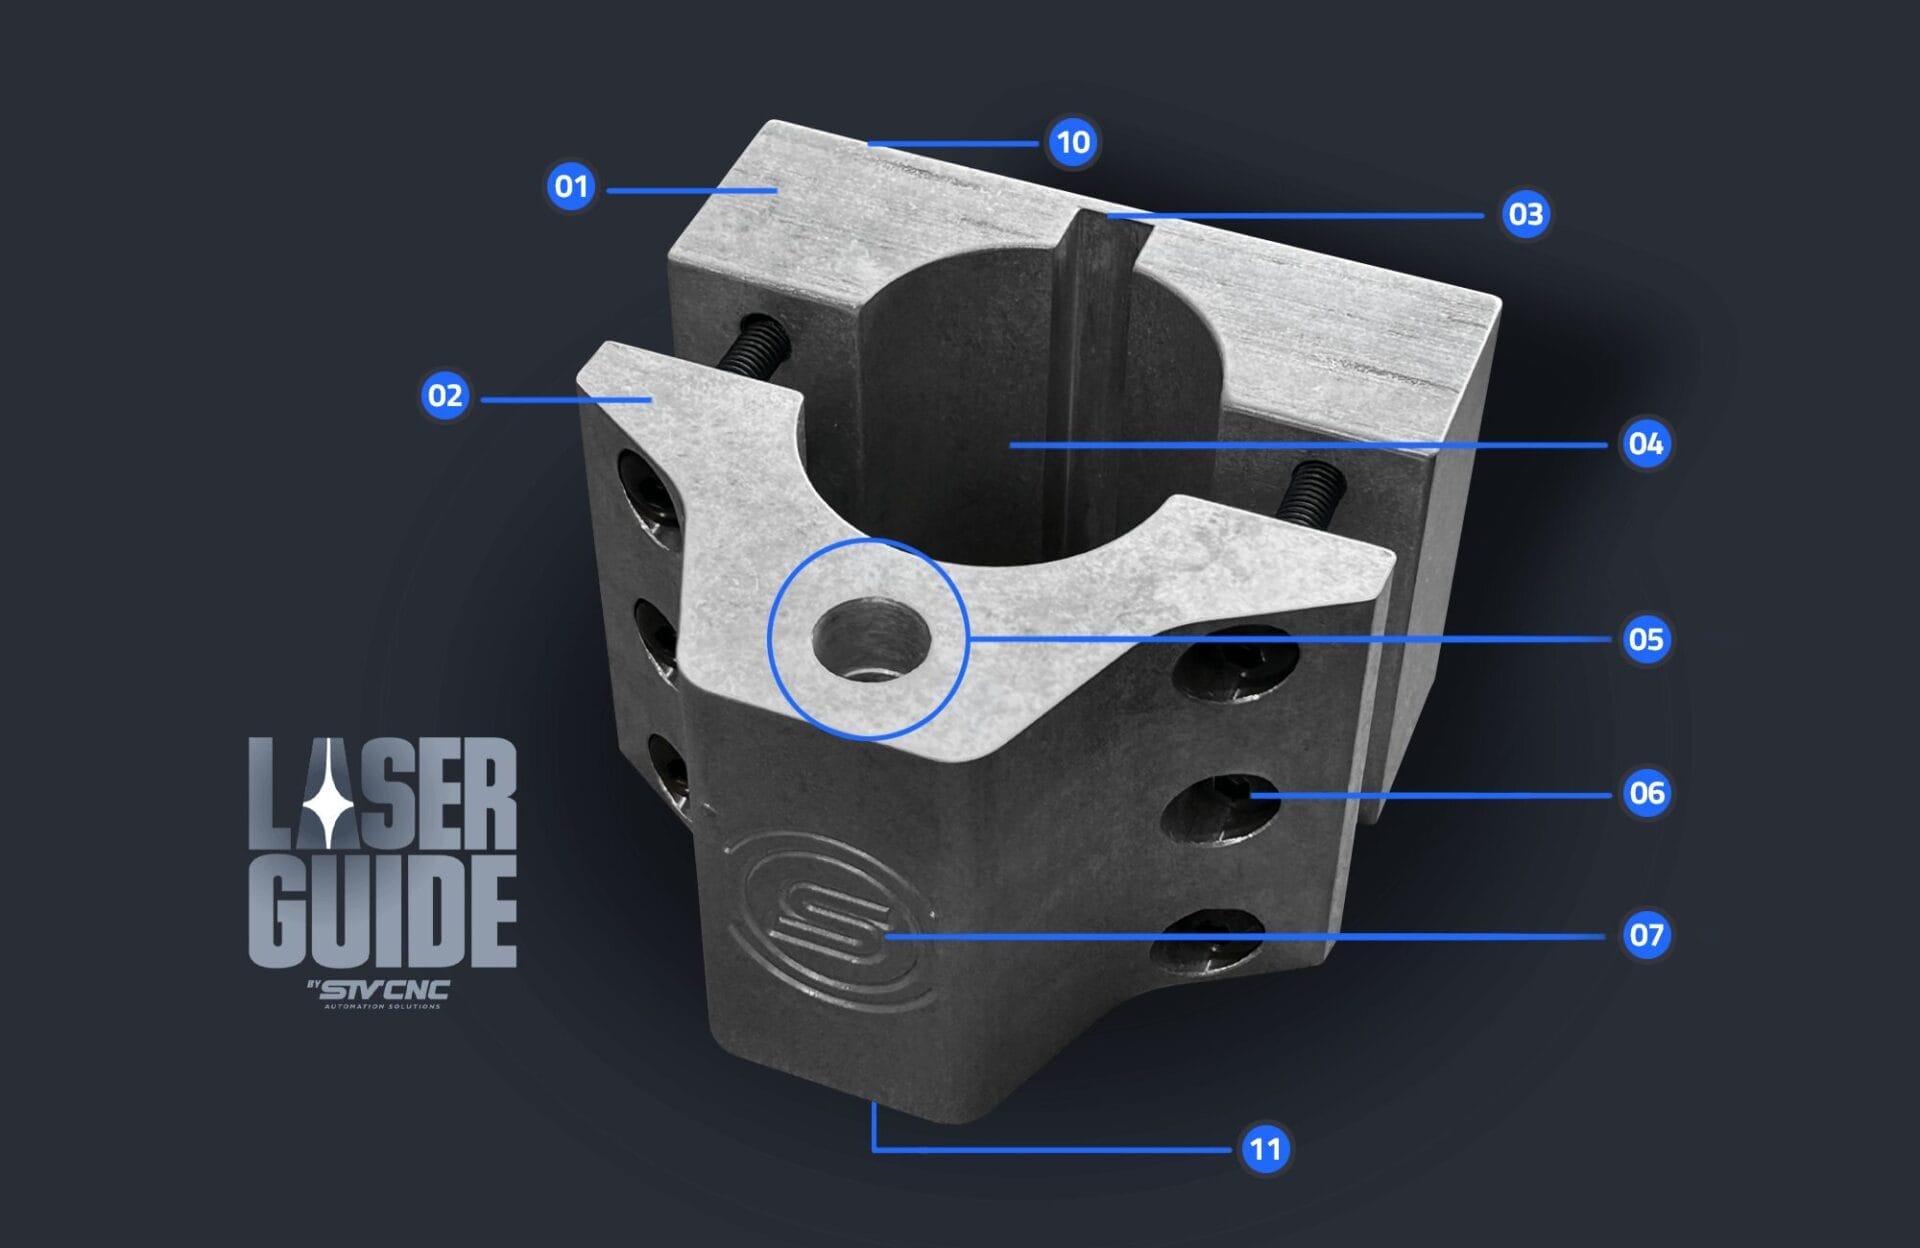
Follow the Diagram above to see the labeled numbers that apply:
( 1 ) TORCH CLAMP REAR: THE REAR CLAMP IS NOT INCLUDED IN PURCHASE. YOUR PLASMA TABLE HAS THIS PART INSTALLED.Your Plasma Table has this part installed. The Torch & Rack Clamp Rear is the backside of a 2-piece clamp for largest opening on the Aluminum Laser Guide Mount. It keeps the Torch steady and locked in place. Remember to set the torch at a 7.5″ inch distance from the bottom of the torch holster to the tip of the mechanized torch.
( 2 ) TORCH CLAMP FRONT FACE: The Torch & Rack Clamp Front Face is the frontside of a 2-piece clamp for the largest opening on the Aluminum Laser Guide Mount. It keeps the Torch steady and locked in place. Remember to set the torch at a 7.5″ inch distance from the bottom of the torch holster to the tip of the mechanized torch.
( 3 ) TORCH RACK: When installing your torch please make sure the Torch Rack on the backside of your Mechanized Torch tucks into this Torch Rack pocket of the Torch Holster. If your Mechanized torch foes not have a backside rack, please disregard this itemized point.
( 4 ) TORCH HOLSTER: The Torch Holster is the Matte Aluminum finished block that clamps, keeping the Mechanized torch locked and in place. The Laser Guide also sports STV®CNC’s New Iconic “S” Insignia on the front.
( 5 ) LASER MOUNT: The Laser Mount is the opening where the Laser Sight sits into. Remember to inspect the openings ever so often to keep the upper and lower hole openings free and clear or any gunk or debris so that it does not obstruct the laser’s path.
( 6 ) MOUNTING SCREWS: THE FASTENERS ARE NOT INCLUDED IN PURCHASE. YOUR PLASMA TABLE HAS THESE PART INSTALLED. The Torch Holster fastens down with (6) mounting screws. You will notice your longer screws lock into the backplate.
( 7 ) INSIGNIA: The Torch Clamp Front is engraved in-house with the New STV®CNC “S” Icon Insignia.
( 8 ) LASER SIGHT: (Included, but not shown in Diagram) The Laser Sight is a mini laser device unit to be set into the Laser Mount Opening and direct the Laser path down onto the work area working parallel to the Mechanized Torch.
( 9 ) BATTERIES: (Included, but not shown in Diagram) Your Laser Guide uses LR41 Batteries. To save battery power, use the laser guide as needed always remembering to turn OFF your Laser sight when not in use.
( 10 ) FINISH: The Laser Guide is machined in-house & burred to a matte aluminum finish.
( 11 ) LASER EXIT: Keep Laser away from eye exposure. The Laser Guide will emit a solid red dot laser from the bottom end of the block down towards the material you will be cutting, helping alignment & position (For more benefits, See Features Above).
FAQ
Which Plasma Table is the Laser Guide compatible with?
This product will fit Optimum Servo Motor Plasma Tables specifically running on Optimum CNC Software.
The Laser Guide also fits the NEW Hurricane H3 NANO Pocket Plasma Table Production line.
This item currently does NOT fit SparX Modular Plasma Tables nor SparX PRO plasma tables.
What is included in the Box?
Your purchase includes (1) Aluminum Matte Finish Torch Holster Front Face of Clamp, (1) Laser Sight with Batteries.
Does the Laser Guide fit my Torch?
At the top of this page, near the “add to cart” button, you will have to select what “Torch Type” you have. You will have to select a 45/65/85/105 Standard torch option or a 125 larger torch type size. Your choice of the torch type is required for purchase.
What if I had a Standard Torch Type prior and have upgraded my Cutting System to a 125 Torch Type?
If you have upgraded from a 45/65/85/105 Standard or SYNC® Mechanized Torch to a 125 Mechanized Torch Type, please call us 1-855-974-4413, as you will require the rear side of the torch holster clamp to correctly grip your wider 125 Mechanized Torch.
What if I lose my Laser sight?
If you misplace or lose your Laser Sight, you will need to reach out to us to purchase a new Laser Sight Purchase as we have them in stock.
How do I turn off my Laser Guide?
Your Laser Guide has a ON/OFF button at the top of the Laser Sight. We advise to TURN OFF your Laser Sight when not in use.
What Batteries does my Laser Guide require?
Your Purchase includes batteries already. Your Laser Guide uses LR41 Alkaline batteries. Avoid installing old or used batteries. Additional LR41 batteries are easily accessible online or locally.
Any cautionary advice on this device?
Please make sure to always install new batteries in the correct direction.
Important: Keep away from eye exposure.
We recommend keeping the Laser device switched to OFF when not in use and place it in a dry, clean and safe place near your work area, preferably at room temperature when not in operation ( this is due to the upkeep & maintenance of laser and batteries ).
What if my Laser Guide stops working?
From what was mentioned above, there are a few reasons why the laser guide will not work.
Check the Laser exit area as there may be debris or gunk preventing the laser in reaching the material.
The batteries may have died and need to be replaced with new batteries.
The batteries have been installed incorrectly within the battery compartment.
The Laser Guide has come in contact with a substance, solution or liquid preventing it from doing its purpose electronically.
The ON/OFF button needs to be clicked into the ON position to function.


Damien –
➤ Click here to Read Reviews & Comments.